508035's Workshop
Posted: Wed Jan 07, 2026 2:48 pm
Hi Everyone
Thought I finally begin my own workbench / project thread.
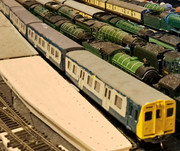
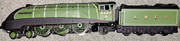
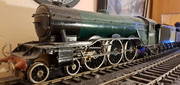
I have had a number of projets going on at various points since I joined this excellent forum which have included things like my O Gauge Hachette A3 which was supposed to be modelled as the Scotsman but as everybody model's Scotsman in 1 of it's many guises I selected 60077 as its number ( nameplates still to be sourced and fitted eventually. Other projects lately were my 2 × 4 coach class 508 units and my union pacific big boy locomotive which is still requiring a number of fittings to be completed, however, progress has recently been made since I posted a picture of it not long after I joined the forum.

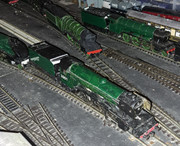
This picture was taken this morning after some late night work fitting the valve gear onto the non pivoting rear drive unit which is currently suffering from a couple of minor issues.
The 1st issue is the gearing :
When I run it, the 3rd driving axle seems to be getting pushed downwards which in turn, lifts the other wheels off the track. I did notice that there could be some wear on the chassis where 1 of the intermediate gears could possibly be moving in a longitudinal direction, because where the axle goes through the chassis, it looks as though where the chassis block was drilled for the gears during production, the drilled area has become slightly elongated although I do have a possible idea to fix it and thus prevent any longitudinal movement.
The other issue is the pickups :
When I started building the loco, I made my own pickups for power collection and on the leading drive unit these work great but on the rear unit, all is not well.
I use albion alloys PB1 phosphor bronze pickup strip when making my home made pickups but at the time I was building them for the loco, I only had enough to do 4 pickups ( 1 for each pair of wheels with 2 pickup strips per side ). Once the individual sets of pickups are in place, additional strip is then soldered between the front and rear pickup pairs, however, at the time I did not have any strip left for this part and ended up using 1 mm brass wire which I must admit, it works well but it doesn't allow much in the way of adjustments to be made and now, of all things, the pickups have started to fall apart, detach from the rear chassis and get very badly snagged when it runs over turnouts so I will be looking at alternatives for arranging the pickups on this drive unit and hopefully prevent any further issues.
Other projects alongside those mentioned above have included 2 BR Blue class 25 locos fitted with cd motors, traction tyred wheels replaced by plain wheels with the gear moulding on the back and extra pickps + weightto improve performance although some work is still needed.
I have also purchased and repowered using hornby motor bogies, 4 × class 37 locomotives ( both hornby and lima versions including the ringfield motor version of 37130 in BR Blue ). 3 of these remain as class 37s while 4th was modified around the cabs where the windows were moved forwards to just behind the yellow area on the nose ends, some improvisation to fill in where the body was cut for the modifications to be made.
I filled the gaps in with plasticard but the result was far from perfect as the plasticard had to be shaped to fit the body, big problem here, the plastic used by lima does not like glue, hence where the top of the body goes up and over for the roof, the plasticard has sloped inwards a bit and some creative thinking is going to be necessary for the body to be finished properly.
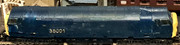
It was built as my interpretation of what a class 38 locomotive could have looked like but would probably look more akin to the lms 10000 / 10001 locomotives, although for my version, it was given the number 38001 based on had they been built the way I have done mine.
I'm not sure if I have a picture of it as I am very hesitant to show it in case of any negative comments about it, I would feel better posting a picture of it once the filled in areas have been fully corrected as there is bodyside grill detail missing where the plasticard was used.
That's all for now and I hope to bring further updates soon.
If you enjoyed reading this opening post, please let me know and I will look at doing more in due course as projects and repairs / loco maintenance progress.
Thought I finally begin my own workbench / project thread.
I have had a number of projets going on at various points since I joined this excellent forum which have included things like my O Gauge Hachette A3 which was supposed to be modelled as the Scotsman but as everybody model's Scotsman in 1 of it's many guises I selected 60077 as its number ( nameplates still to be sourced and fitted eventually. Other projects lately were my 2 × 4 coach class 508 units and my union pacific big boy locomotive which is still requiring a number of fittings to be completed, however, progress has recently been made since I posted a picture of it not long after I joined the forum.
This picture was taken this morning after some late night work fitting the valve gear onto the non pivoting rear drive unit which is currently suffering from a couple of minor issues.
The 1st issue is the gearing :
When I run it, the 3rd driving axle seems to be getting pushed downwards which in turn, lifts the other wheels off the track. I did notice that there could be some wear on the chassis where 1 of the intermediate gears could possibly be moving in a longitudinal direction, because where the axle goes through the chassis, it looks as though where the chassis block was drilled for the gears during production, the drilled area has become slightly elongated although I do have a possible idea to fix it and thus prevent any longitudinal movement.
The other issue is the pickups :
When I started building the loco, I made my own pickups for power collection and on the leading drive unit these work great but on the rear unit, all is not well.
I use albion alloys PB1 phosphor bronze pickup strip when making my home made pickups but at the time I was building them for the loco, I only had enough to do 4 pickups ( 1 for each pair of wheels with 2 pickup strips per side ). Once the individual sets of pickups are in place, additional strip is then soldered between the front and rear pickup pairs, however, at the time I did not have any strip left for this part and ended up using 1 mm brass wire which I must admit, it works well but it doesn't allow much in the way of adjustments to be made and now, of all things, the pickups have started to fall apart, detach from the rear chassis and get very badly snagged when it runs over turnouts so I will be looking at alternatives for arranging the pickups on this drive unit and hopefully prevent any further issues.
Other projects alongside those mentioned above have included 2 BR Blue class 25 locos fitted with cd motors, traction tyred wheels replaced by plain wheels with the gear moulding on the back and extra pickps + weightto improve performance although some work is still needed.
I have also purchased and repowered using hornby motor bogies, 4 × class 37 locomotives ( both hornby and lima versions including the ringfield motor version of 37130 in BR Blue ). 3 of these remain as class 37s while 4th was modified around the cabs where the windows were moved forwards to just behind the yellow area on the nose ends, some improvisation to fill in where the body was cut for the modifications to be made.
I filled the gaps in with plasticard but the result was far from perfect as the plasticard had to be shaped to fit the body, big problem here, the plastic used by lima does not like glue, hence where the top of the body goes up and over for the roof, the plasticard has sloped inwards a bit and some creative thinking is going to be necessary for the body to be finished properly.
It was built as my interpretation of what a class 38 locomotive could have looked like but would probably look more akin to the lms 10000 / 10001 locomotives, although for my version, it was given the number 38001 based on had they been built the way I have done mine.
I'm not sure if I have a picture of it as I am very hesitant to show it in case of any negative comments about it, I would feel better posting a picture of it once the filled in areas have been fully corrected as there is bodyside grill detail missing where the plasticard was used.
That's all for now and I hope to bring further updates soon.
If you enjoyed reading this opening post, please let me know and I will look at doing more in due course as projects and repairs / loco maintenance progress.