Page 2 of 2

Re: Mountain Goats Narrow Gauge Delights.

Posted: Thu Jul 03, 2025 10:56 am
by Mountain Goat
First I need to open up the insides of the lower boiler section and of course, remove the plastic lens.

Image


Image

Re: Mountain Goats Narrow Gauge Delights.

Posted: Thu Jul 03, 2025 10:59 am
by Mountain Goat
So far, so good. A quick test fit next to a narrow gauge loco to check for height. (It is not sitting properly on its chassis yet but I am aware of that).

Image

Next comes work on the footplate.

Image

Re: Mountain Goats Narrow Gauge Delights.

Posted: Thu Jul 03, 2025 11:03 am
by Mountain Goat
Opening up the centre and removing all unwanted areas from the underside below...

Image

And eventually I am left with a footplate I can use...Here is another test fit.

Image

That's more like it!

Re: Mountain Goats Narrow Gauge Delights.

Posted: Fri Jul 04, 2025 8:03 am
by Mountain Goat
Sometimes people see things and love them so much that they want one, either for themselves or for others, so in order to accommodate those who want things who live in America, these have ended up over there.

This locomotive went out a few years ago to a lady who wanted to give It to her Dad. It is complete with drop loop couplings. The tin of black modelling paint I used took many months to dry (8 months) so there was a delay in getting it to her.

Image

And more recently another online friend who has been really wanting a loco for the past few years... I happened to buy a few locos from a modeller who no longer models in 7mm narrow gauge, so I sent a loco her way, along with a brake van I had bought in the past which was a nice patch for the loco. She calls them "Gnomies" after I sent her a Gnomy pick-up vehicle one Christmas in the past.

Image

Re: Mountain Goats Narrow Gauge Delights.

Posted: Fri Jul 04, 2025 8:48 am
by Mountain Goat
But to show one of the perks of using drop loop couplings, these two locos are both fitted with them and the couple up pretty close...

Image

Yet they still allow locos and stock to go round my sharp curves.


Image

Re: Mountain Goats Narrow Gauge Delights.

Posted: Thu Sep 18, 2025 11:38 am
by Mountain Goat
Making little carriages from kids toys.

Image


Image


Image

As there are only doors on one side, I can use the door side to make 3 window carriages and the non-door side to make 4 window carriages. The smaller windows may need re-arranging as to their position in the vehicle as these are ideal to form new doors.

Re: Mountain Goats Narrow Gauge Delights.

Posted: Thu Sep 18, 2025 11:48 am
by Mountain Goat
One can make a short 3 window carriage from the door side by re-arranging the windows. (On the non-door side one has enough to make a 4 window carriage. (I am not using the origional doors though I will keep them for other projects)).

Image

Image

As can be seen, the sides have been cut in slots so I could re-arrange the slots so the smaller window now sits in the middle of the carriages so they will form doors.

Image

I am re-using the roof, but I will make new ends and floor etc.

(Pictures come from making more than one carriage sides, so ignore positioning of logos if one may be confused. Look at the size of the windows. These toys also come in blue, as seen above. In the toys the small windows we are repositioning are at the ends next to the doors, which are in the wrong place which is why we need to move them for these 3 windowed carriages).

Re: Mountain Goats Narrow Gauge Delights.

Posted: Tue Oct 21, 2025 11:22 pm
by Mountain Goat
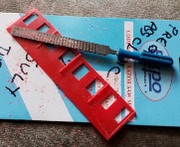
In with other delights I had bought from a modeller in the past who had moved into the realm of other scales, I came across some damaged castings, and I thought "I can do something with these!"
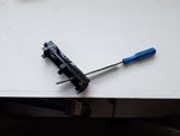
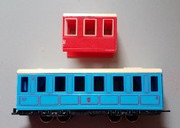
So also in with a collection was a rebuilt and slightly shortened Hornby 0-4-0 chassis that had a replacement motor glued or fixed onto the slanted internal weight so didn't need a cradle. Checking cautiously it was ok to run on 12V DC (As I have seen these motors come in 3v, 4.5v, 6v, and 12v forms), I did a little test. Needs a wheel clean etc to run well but at least I know it is a 12v motor.


Image

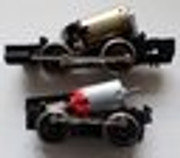
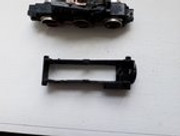
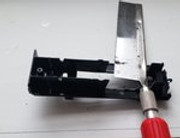
Now I have further cut down this chassis and I have taken a little too much off the back. I include an unaltered chassis as a reference. If I was to do this again, I could have saved myself some work by leaving the sandboxed on at the back of the chassis, as the footplate would naturally sit on this area if left in place. Asia is, I have a bit more to do with the body to make things sit nicely, so anyone doing the same, one can cut the front down but leave the sideways suppor in front of the worm, and at the rear of the chassis, one can cut up to the sandboxes, BUT leave the sandboxes on if that makes sense? Of course, if one needs cylinders at the front one will not be cutting this part so short!

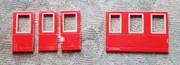
So... What about a body and a cab to sit on a footplate?

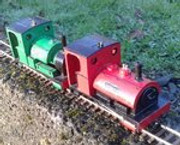
Well... That is what I am building now but in shortened form to match the chassis. Another aspect with these chassis, is that as the wheels are large, one does need to try and get the models overall look to be balanced. If one shortens the body further than I have done, the overall effect will not look right using this chassis as the wheels will look out of killer with the body. Yes one can cover wheels with valance but I rather like to see the con-rods and wheels on such a loco like this. I do plan to alter the look of the wheels too, but one step at a time.


Image

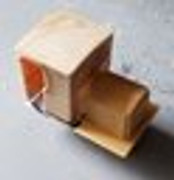
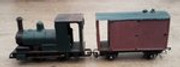
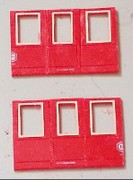
The cab is balanced in position in the photograph as I want to paint and finish inside the cab before I glue the cab in position. The black bits on the cab floor and footplate area is marker pen to work out the marks where I want toe cab to go.