Mountain Goats Narrow Gauge Delights.
-
Mountain Goat
- Posts: 1698
- Joined: Fri Oct 05, 2018 12:57 pm
- Contact:
Re: Mountain Goats Narrow Gauge Delights.
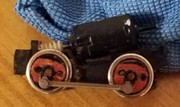
I thought I would turn my attention to the wheels as I want to make them look a little more diesel shunterish, so I pushed modelling clay into the wheels and reamed out some holes which did not exactly go where I intended but it worked, and I carefully applied superglue to lock in the new design.
Budget modelling in 0-16.5...
-
Walkingthedog

- Posts: 5149
- Joined: Thu Oct 04, 2018 5:51 pm
- Location: HAZLEMERE, BUCKS.
- Contact:
-
Mountain Goat
- Posts: 1698
- Joined: Fri Oct 05, 2018 12:57 pm
- Contact:
Re: Mountain Goats Narrow Gauge Delights.
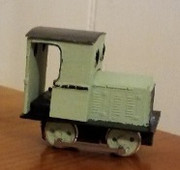
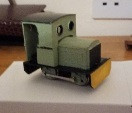
Thanks Walkingthedog. I have given it a first coat of paint to see if I liked the colour. The cab is balanced on the body and the body is balancing on the chassis to take the photograph. More painting will come and I have yet to build up some bufferbeams and other details.
Budget modelling in 0-16.5...
-
Mountain Goat
- Posts: 1698
- Joined: Fri Oct 05, 2018 12:57 pm
- Contact:
Re: Mountain Goats Narrow Gauge Delights.
Still doing more to it and there is more yet to do, but I thought I would share a picture of the size difference of the shortened chassis by showing this little diesel next to another loco. (The diesel shunter will look nicer when I do more to it).
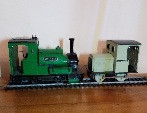
The loco on the left was once on a standard Hornby "Smokey Joe" type chassis, but has since had a much modified Triang chassis using Hornby chassis parts, but it does give an idea of size.
I used to see a little diesel shunting in my youth at a wagon repair works, though it was standard gauge and had a more modern cab, and was yellow. It brings back memories!
Budget modelling in 0-16.5...
-
Mountain Goat
- Posts: 1698
- Joined: Fri Oct 05, 2018 12:57 pm
- Contact:
Re: Mountain Goats Narrow Gauge Delights.
Ok. So where did we leave off last time? Well. After doing a fair bit of less noticable alterations and improvements inside the cab area and also finding a means to secure the chassis to the body (If I have not mentioned this earlier), How about some bufferbeams before I turn back to adding more cab detail and also more below footplate detail etc.

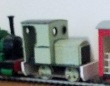
I hope the last photo is visible as it has come from cropping another picture (As the loco was in the background) for now until I do more and will take a better picture. The cab is not glued down to the footplate as yet as I would like to add a little detail.
I also have plans for this little loco to experiment with an improved coupling which will couple to drop loops as well as other types of coupling such as tension lock, and I thought this little loco would be the ideal loco to try out my ideas on. We shall see how things turn out.
Budget modelling in 0-16.5...
-
Mountain Goat
- Posts: 1698
- Joined: Fri Oct 05, 2018 12:57 pm
- Contact:
Re: Mountain Goats Narrow Gauge Delights.
The bufferbeams are now yellow...
[Just to add. Can others see the picture? It works ok on my side].
[Just to add. Can others see the picture? It works ok on my side].
Budget modelling in 0-16.5...
-
Mountain Goat
- Posts: 1698
- Joined: Fri Oct 05, 2018 12:57 pm
- Contact:
Re: Mountain Goats Narrow Gauge Delights.
I am currently experimenting with card. Ritz Crackers box in this case using superglue to both glue and stiffen up the card, and this is as far as I have got...
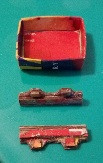
The good thing about card is that when layers are added, it does become sufficiently heavy enough so one may not need to add additional weight. The other good thing is that the material is that it is easy to find and can usually can be obtained for free, though I would probably have used around 50 pence worth of glue by the time I am finished, and with a decent paint designed for exterior use, the card should withstand the odd shower if used outdoors.
While this is an experimental build just to explore the possibilities, I have been especially impressed with the sturdiness of the card body. I did glue in two extra layers of card to the inside of the base of the body using superglue where I had initially glued the main body structure using UHU glue, and while UHU glues card very well, runny superglue differs in that it absorbs into the structure of the card to make it stiff when applied to the non-shiny surface of the card itself.
So as wooden lollypop sticks are also another source of cheap or freely available material, I would say the ideal combination is to use card for the body and wood for the chassis. Yes, tin is also ideal to make the bodies from and is very sturdy, but the ease of how quick one can make bodies from card, and the ability to make the body so that the protective printed side of the card is visibly outwards ready to be painted, gives an unexpectedly rigid structure. The combination of using UHU for the main body structure and superglue to add a pair of additional stiffer layers in the base of the body just works!
The layers of card used to form a chassis structure do take too long to make if one wants to build a lot of them. Although certainly do-able, timewize, lollypop sticks with an internal H-pattern chassis is quicker.
Budget modelling in 0-16.5...