
I have built both of my layouts that way. Before connecting up the cross board tracks it’s a simple job to flip the board on its side to make wiring a doddle. Provided the boards are not too big they can be moved to a different location for ‘dirty work’.
First ever baseboard
Re: First ever baseboard
"Not very stable, but incredibly versatile." 
Re: First ever baseboard
Steve, you’ve got me convinced and using Brian’s links I’m going for dowels and coach bolts to connect it all up.
I can’t get my head around the track joints but will do some more reading. Anyone know of a good YouTube video showing you how to lay the tracks across joints?
Dave&Luke
I can’t get my head around the track joints but will do some more reading. Anyone know of a good YouTube video showing you how to lay the tracks across joints?
Dave&Luke
Re: First ever baseboard
There is, if I remember correctly, some info on Brian Lambert's site for board joints. A few pics on my West Orton thread (page 5 onwards) may help to visualise how I did it using copperclad sleepers either side of the joint. Solder the rails to the copperclad then cut the rails with a fine saw.
"Not very stable, but incredibly versatile."

Re: First ever baseboard
This drawing drawing link shows both PCB sleeper strip (not forgetting to gap the copper between rails and two adjacent tracks if the strip is long enough to span two tracks) and small brass countersunk wood screws used at the baseboard edge which can be adjusted up or down to match the rail undersides. The hardwood strips shown along the boards abutting edges are optional.
Both methods involve laying a length of track across the board join having three or more plastic sleepers removed, then soldering the rails to the PCB copper strip or the screw heads. Once solder has cooled cut through the rails in line with the board join - use a Razor saw and a means of holding the rails steady while sawing them or a slitting disc in an electric Dremel type drill.
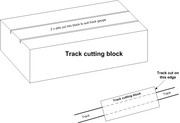
This is how I hold the rails in place while cutting them with a Razor saw. Simple wooden block with two parallel slots cut along its length which are rail distance apart. The block pushes over the rails and holds the rails firmly while the square edge of the block gives a straight cutting guide if needed.
Both methods involve laying a length of track across the board join having three or more plastic sleepers removed, then soldering the rails to the PCB copper strip or the screw heads. Once solder has cooled cut through the rails in line with the board join - use a Razor saw and a means of holding the rails steady while sawing them or a slitting disc in an electric Dremel type drill.
This is how I hold the rails in place while cutting them with a Razor saw. Simple wooden block with two parallel slots cut along its length which are rail distance apart. The block pushes over the rails and holds the rails firmly while the square edge of the block gives a straight cutting guide if needed.
 << Click the Icon to go to my website
-
Mountain Goat
- Posts: 1687
- Joined: Fri Oct 05, 2018 12:57 pm
- Contact:
Re: First ever baseboard
There are two ways to get track across joints where the layout needs to split apart. The first is to run the rails to the edge of the board and make some PCB sleepers in which the ends of the rails can be soldered onto them. Usually easier to run the track straight across and solder onto a PCB board (May need card under the PCB so the PCB height is the same railheight as the plastic sleepers as plastic sleepers raise the rails just less then a mm...), and then once the rails are soldered, then with a carbodium disc mounted via a mandrel on a minidrill (Wear eye protection) one cuts through the rails and the wide portion of PCB sleeper where the two boards join.
Some solder their rails onto screw heads instead of using PCB as one can adjust the height before soldering.
The other method that I employ came because one of my boards slightly twists compared to if it is summer or winter and rather then making adjustments according to the seasons, I decided to use the "Other menthod" to ensure greater reliability where any issues take place, and this is to cut the rails short of the edge and making short pieces of "Bridge track" (Which is what I call them) to be put in position after (Or even while) the boards are joined together. The key to do this is to make sure that one has enough rail room without sleepers getting in the way to slide the railjoiners back to allow the rails to fit. I use old Lima railjoiners as these are nice and supportive and strong, as I was told that Peco joiners (Or Hornby) don't like being repeatedly moved so need to be changed now and then. Never changed the Lima joiners as yet. They seem fine. Unfortunately one has to buy a few pieces of old Lima track to get the railjoiners off them as I don't believe they are made, though Peco joiners will be fine.
Budget modelling in 0-16.5...

Re: First ever baseboard
Thank you for the detailed responses.
I do have a Dremel, I think I’ve got my head around it. The ready made contact points look good, I think I’ll try the DIY option first and see what happens.
I’m starting this project on Friday (sons birthday) so will see how I get on.
Thanks again
I do have a Dremel, I think I’ve got my head around it. The ready made contact points look good, I think I’ll try the DIY option first and see what happens.
I’m starting this project on Friday (sons birthday) so will see how I get on.
Thanks again

Re: First ever baseboard
Good luck Gixer. We all started in the same place - it’s a wonderful journey. R-
Young at heart. Slightly older in other parts.

Re: First ever baseboard
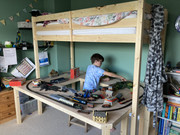
It begins!
Thanks for the advice guys, I spent all day today building the board. I’m pretty chuffed with it TBH, I’ve got some finishing to do but it will do for now. We’re planning the layout now…